budō allows you to get your scripts up and running quickly in a local environment.
First, you will need NodeJS and npm. Then you can install the tools globally:
npm install budo -gNow we can run budo to serve a file and start developing.
budo index.jsOpen http://localhost:9966/ to see the bundled result of index.js.

Saving index.js will be incremental, which means it will be fast even if your app spans hundreds of modules.
If you specify the current directory, it will resolve to the "main" field in your package.json, otherwise index.js.
budo .You can see the full list of command-line flags in the README.md.
Notice we haven't had to write any HTML! If you want to, though, you can drop index.html in the same folder that you are serving budō from (or the base --dir folder), and it will use that instead of a dynamically generated index.
The src for your script tag should match the filename of the entry point you gave.
<script src="index.js"></script>You can specify a different end point for the server with a colon. This is useful for relative and absolute paths, for example:
budo /proj/foo/index.js:static/bundle.jsNow, you can use the following as your HTML:
<script src="static/bundle.js"></script>Also see the [--serve option](#multiple entries).
If you are using these in your modules for demos/etc, you should save them locally so that others can get the same versions when they git clone and npm install your repo.
npm install budo --save-devFor local tools, we need to use npm-scripts. Open up your package.json and update "scripts" so it looks like this:
  "scripts": {
    "start": "budo index.js"
  }
Now running the following will start the development server:
npm run startbudō also includes support for LiveReload. The --live argument injects a script tag into your HTML file and listens for a live reload server.
budo index.js --liveNow when you save the index.js file, it will trigger a LiveReload event on your localhost:9966 tab after watchify has finished bundling. It also listens to HTML and CSS reload, and injects stylesheets without a page refresh.
From the command line, you can specify a filename glob to only trigger LiveReload in those cases. For example, to only allow CSS and HTML changes to trigger a LiveReload:
budo index.js --live=*.{html,css}Note: Your index.html must have a <body> tag for the LiveReload script to get injected!
Budo also supports multiple entry points; they will all get concatenated into a single bundle. If you aren't using a colon separator (:), the entry point will default to the first path. Or, you can explicitly set the path with the --serve option, as below:
budo test/one.js test/two.js --serve static/bundle.jsNote the path here is relative to your --dir folder from where the index.html is being served.
Everything after the -- argument will not be parsed/manipulated, and will be passed directly to browserify.
budo main.js --live -- -t babelify -t glslifyYou can also add a "browserify" field to your package.json file, and budo will use that config. This is not typically recommended for modules, but it can be useful when building applications.
To launch the browser once the server connects, you can use the --open or -o flag:
budo index.js --openAlso see opnr, which allows for a similar functionality without forcing it as a command-line flag.
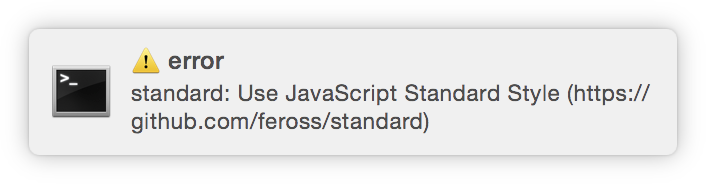
In the CLI, you can run shell commands when the bundle updates using the --onupdate option. For example, to lint with standard and provide an alert with notify-error:
budo index.js --onupdate "standard | notify-error"Now, when you save the bundle, standard will run on your directory. If lint errors are found, they will print to the console and show an alert notification:
The flag is only available in the command-line.
By default, budo's server will listen on your internal IP. This address is the first message logged to terminal.
This makes it easy to test during development across devices.
You can specify another address with the --host flag.
You can set a --pushstate flag to make the server capable for HTML5 pushState Single-Page Applications.
Now, any 404 requests (such as /foo/bar/blah) will get routed to the home index.html.
It is suggested you add a <base> in your index.html for this to work with nested paths:
<head>
  <base href="/">
  <!-- styles, scripts, etc... -->
  <link rel="stylesheet" href="main.css">
</head>
If you let budo generate a default HTML page, you can add the <base> tag using --base or --base /my-path.
The --pushstate flag also supports subarg syntax, with options passed down to connect-pushstate. For example:
budo index.js:bundle.js --pushstate [ --disallow foo/bar ] --live
⚠️ As of budo@10.x the command has to be specified after the index/JS entries.
The following can integrate easily with budo:
- Generic HMR: browserify-hmr
- React: livereactload
- Vue: vueify (to be used with
browserify-hmr)
You can usually follow the steps in those tools, except instead of using watchify, we will use budo and pass our browserify options after a full stop --.
Example with livereactload:
budo index.js:bundle.js -- -t babelify -p livereactloadMake sure you don't pass a --live flag to budo, otherwise it will trigger hard reloads on file save.
To get HTTPS working, you can specify a --ssl flag:
budo index.js --sslThis will generate a self-signed certificate that expires after one day, and runs the server on https.
You can also generate your own self-signed certificate and specify the file paths manually:
budo index.js --ssl --cert=mycert.pem --key=mykey.pemThe easiest way to get SSL working without browser warnings is to use mkcert to generate your locally trusted development certificates and specify them for use in budo:
mkcert -install  # create a local certificate authority and trust it
mkcert localhost # create a local certificate for localhost
budo index.js --ssl --cert=localhost.pem --key=localhost-key.pem
If you don’t want to use mkcert, for best results (such as LiveReload support) ensure you open the actual IP in your browser, such as https://192.168.1.7:9966/ (the IP should be listed in terminal).
In Chrome and some other browsers, you may still need to accept the certificate to test it locally. You can do so by clicking "Advanced" and then "Proceed", as in this screen shot:
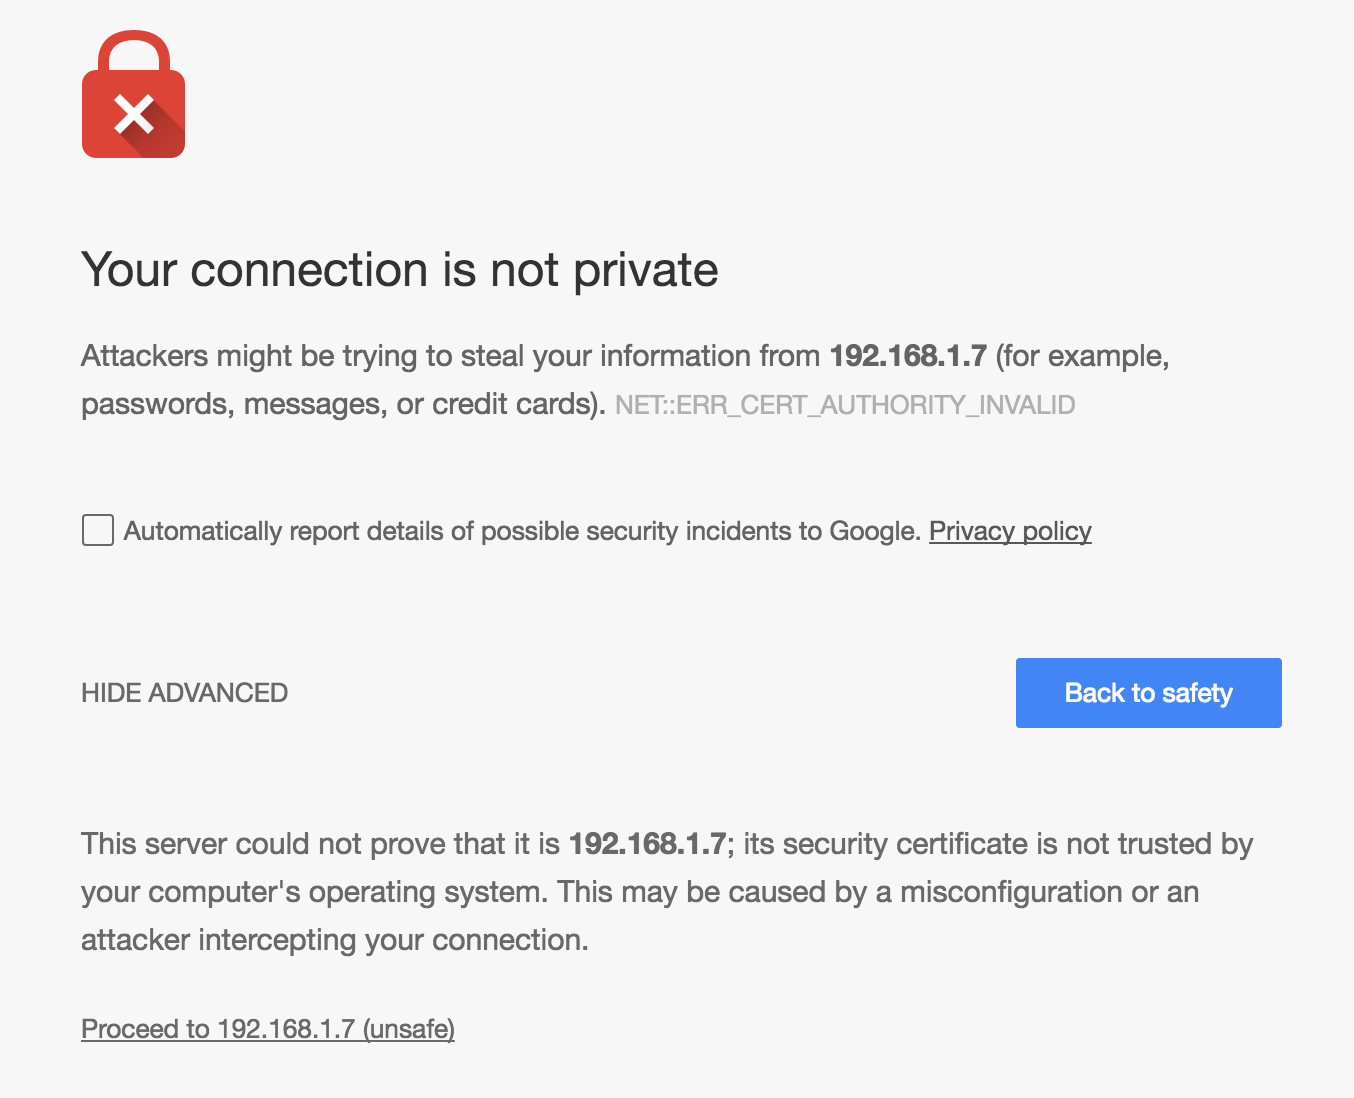
You may also want to Allow invalid certificates for resources loaded from localhost, see this flag: chrome://flags/#allow-insecure-localhost.
Recent versions of iOS will not support WebSockets for untrusted self-signed certificates. The HTTPS server will work, but LiveReload will not connect.
To get at trusted certificate, you can use LetsEncrypt if you have a domain. Or, you can follow these steps to get LiveReload working on iOS with a self-signed certificate. The steps assume an OSX computer.
- Find your internal IP, this should be listed in the terminal when budo starts, and in System Preferences > Network e.g.
192.168.1.50.
Tip: You may want to use a static IP to avoid these steps in the future.
- You need to create a new certificate and key with this IP using the
opensslcommands.
openssl genrsa -out server.key 2048
openssl req -new -x509 -sha256 -key server.key -out server.cer -days 365 -subj /CN=192.168.1.50
The CN field should be set to your IP in step 1.
See here if you don't have OpenSSL installed.
- Now run budo with these to confirm it works:
budo --ssl --cert=server.cer --key=server.keyAnd paste the full URL in chrome, such as https://192.168.1.50:9966/
- Now open the DevTools and click the Security tab. You should see an error like the one below:
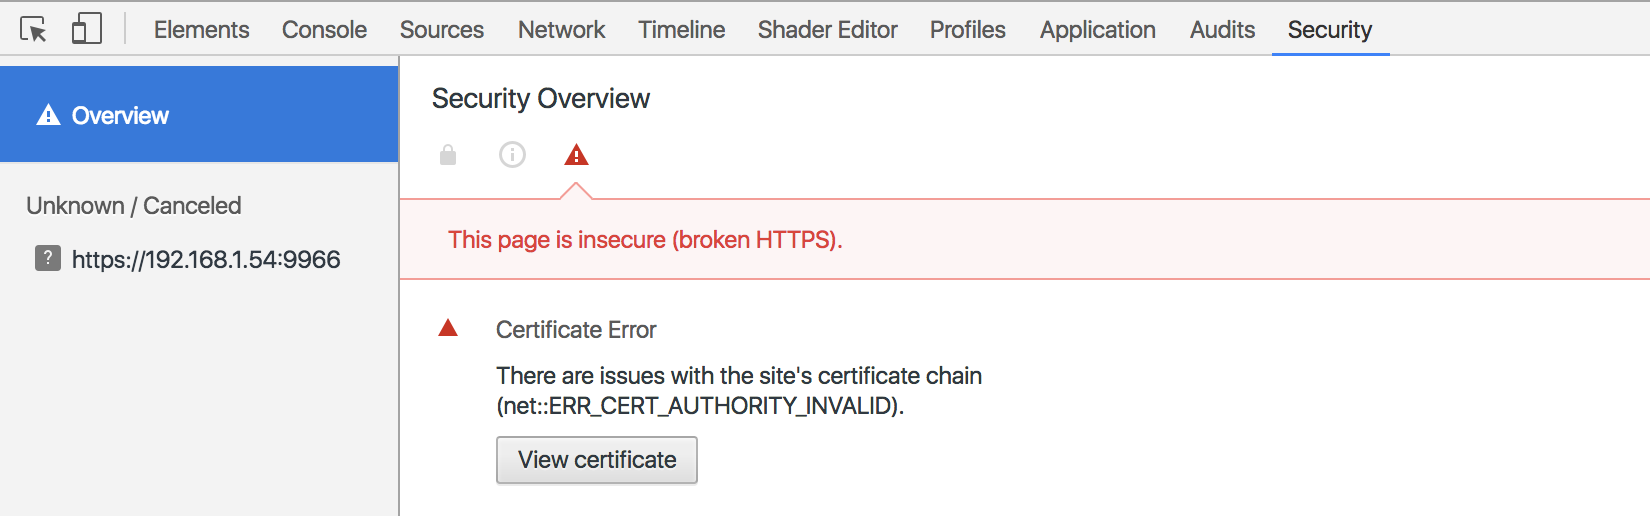
Click the View Certificate button, and in the new window Drag & Drop the certificate thumbnail to your desktop.

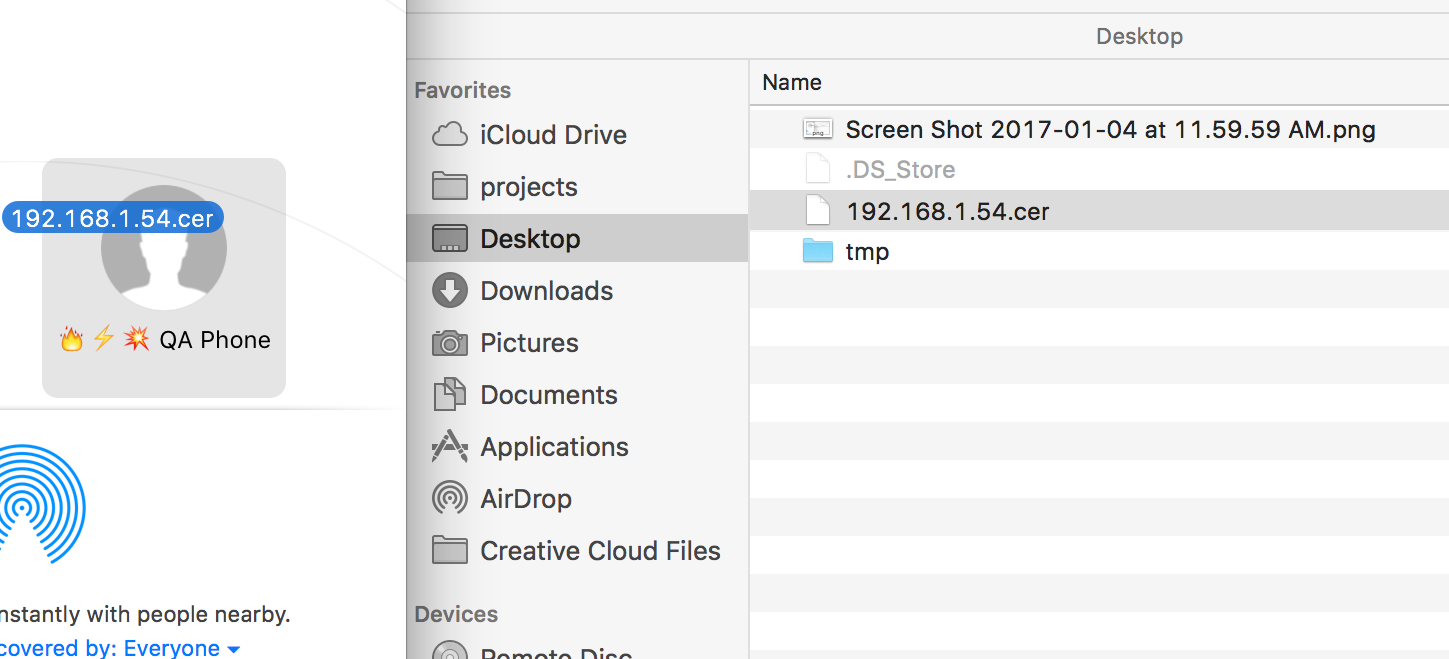
- This will create a file like
192.168.1.50.ceron your desktop. AirDrop, email, or otherwise transfer this to your iOS device.
- Accept the file and
Installthe certificate. This will add the certificate to yourGeneral > Profilespage.

Now you should be able to open the same URL on your iPhone for WebSockets and LiveReload to work correctly! 🎉
You can follow the steps in SSL on iOS to trust a self-signed certificate file, like 192.168.1.50.cer, for your desktop as well.
After generating the .cer file, you can double-click it top open it in Keychain. Double-click the listed certificate in Keychain to modify its settings.
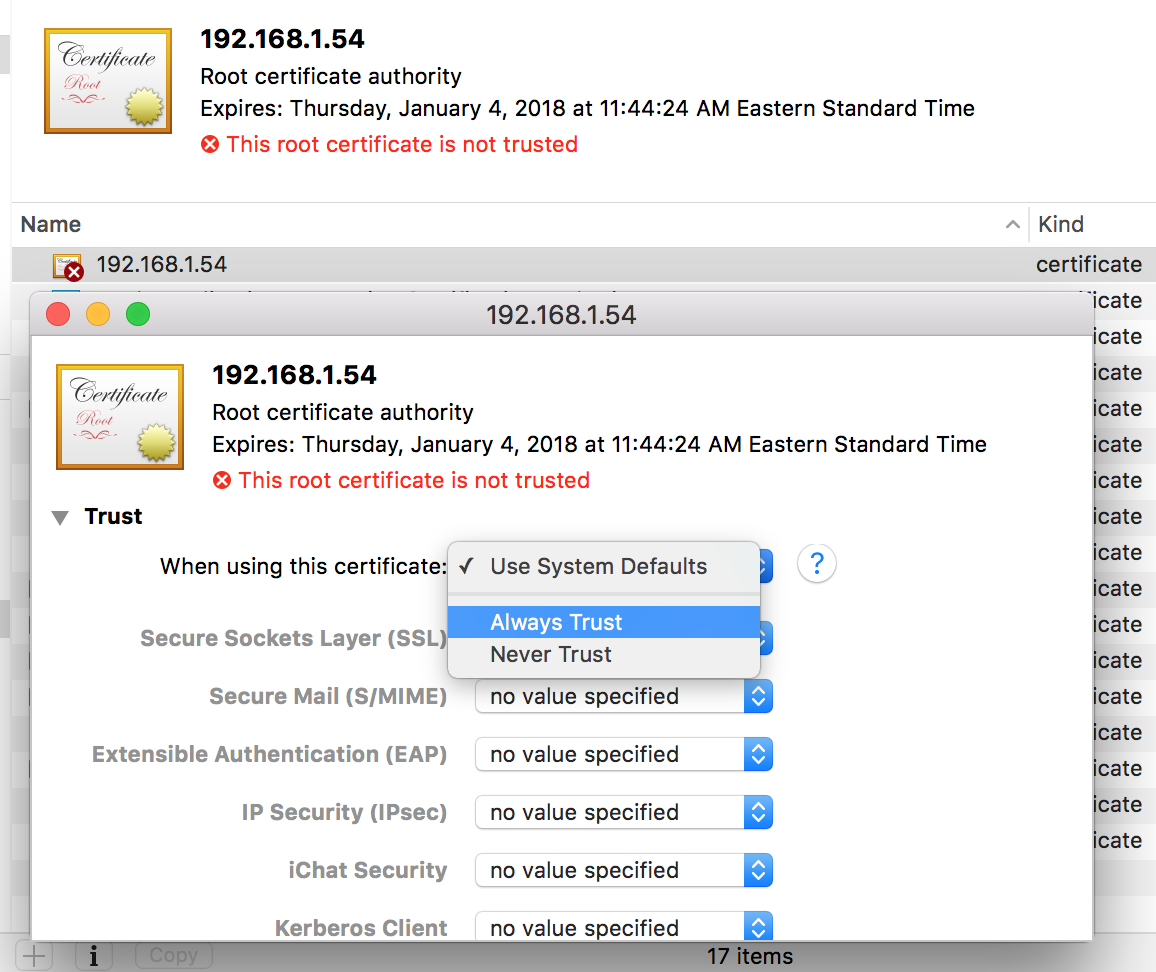
Click the arrow to the left of Trust to expand it, and select "Always Trust" from the drop-down.
Close the window (you may be prompted for your root password) and the certificate will no longer give you errors in Chrome and other browsers! 🔥