


DesktopBusinessAppSharpBuilder is a C# framework built on .NET, utilizing Windows Presentation Foundation (WPF). It is designed to expedite the creation of business applications by offering a comprehensive set of tools and classes designed for efficiency and scalability. This framework is built on .NET 8.0 specifically for Windows. This means the application will use the .NET 8.0 runtime and is intended to run on the Windows operating system.
Over the years, I recognized a recurring challenge in the development of business-oriented applications: the need for a streamlined, efficient approach that reduces development time while maintaining high standards of functionality and performance. This realization led to the creation of DesktopBusinessAppSharpBuilder.
The primary objective of DesktopBusinessAppSharpBuilder is to accelerate the development of business applications by providing a robust set of custom controls, classes, and utilities. This allows developers to focus more on business logic and less on the repetitive tasks often associated with application development. Developers can focus on designing the user interface in XAML, defining classes that represent their database tables, and implementing any other business logic their application might require. By handling routine tasks and providing essential components, the framework simplifies development, allowing programmers to work more efficiently and effectively on their projects while the Framework takes care of various aspects of Windows Presentation Foundation (WPF).
-
Custom ORM:
- Includes a custom Object-Relational Mapping (ORM) system. Automatically builds queries based on the defined models, simplifying database operations.
-
Database Management:
- Supports MySQL and SQLite databases.
- Provides a set of classes to manage database operations seamlessly.
-
MVC Pattern:
- Implements the Model-View-Controller (MVC) pattern.
- Abstract classes and interfaces designed to manage the Model and Controller components effectively.
-
Data Binding:
- Despite following the MVC pattern, data binding is extensively used to simplify UI updates and interactions.
-
Custom Controls:
- Includes custom WPF controls such as Form, FormList, and SubForms, ReportViewer which are not available in standard WPF.
-
Win32 API Integration:
- Uses the Win32 API to achieve advanced functionalities that enhance the capabilities of WPF applications.
-
Security:
- Utilizes the Windows Credential Manager System to securely store and manage sensitive information such as database connection strings and passwords.
-
Email Integration:
- Allows integration of your own email service to send emails directly from the application.
-
Excel Integration:
- Provides classes to easily create and read Excel files through COM (Component Object Model). Supports generating reports and data export/import functionalities.
-
Single File publishing:
- The Application can be distributed as a Single File, getting around the SQLite assembly issue.
This framework was build by using the following NuGet Packages:
- Microsoft.Xaml.Behaviors.Wpf (Version 1.1.77); Author: Microsoft.
- Refractored.MvvmHelpers (Version 1.6.2); Author: James Montemagno.
- System.Data.SqlClient (Version 4.8.6); Author: Microsoft.
- System.Data.SQLite (Version 1.0.118); Authors: SQLite Development Team.
- System.Drawing.Common (Version 8.0.5); Author: Microsoft.
- System.Linq.Async (Version 6.0.1); Authors: Microsoft and other contributors.
- MailKit (Version 4.6.0); Author: Jeffrey Stedfast.
- MimeKit (Version 4.6.0); Author: Jeffrey Stedfast.
- MySqlConnector (Version 2.2.7); Author: Bradley Grainger.
- System.Management (Version 8.0.0); Author: Microsoft.
Picture 1 below shows the MCV pattern handled by the Framework.
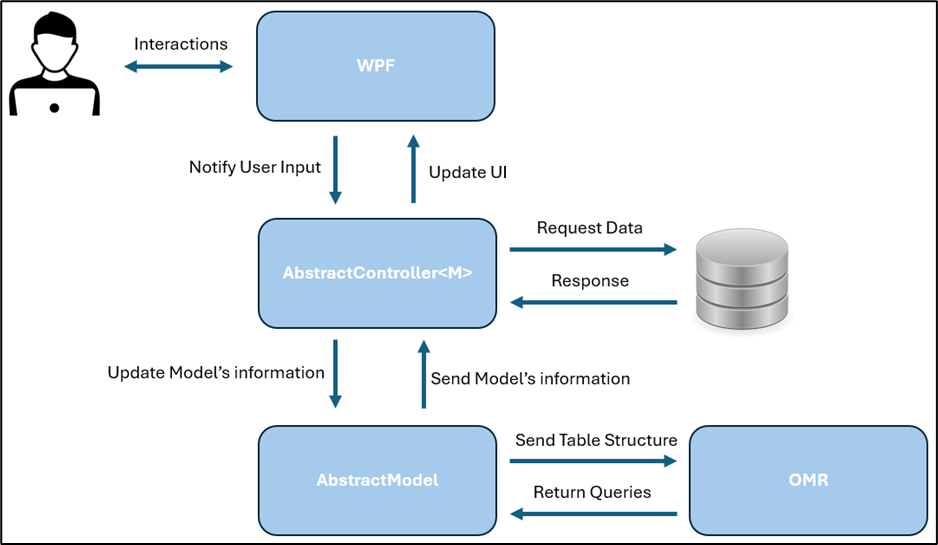
AbstractModel represents the structure of a table within a database. It not only defines the schema but can also be extended to include methods and additional properties, just like any other class. This class utilizes a set of custom attributes to specify which properties are primary keys, foreign keys, or normal fields. This metadata is then sent to the QueryBuilder class (the ORM), which generates default SQL statements for SELECT and all CRUD (Create, Read, Update, Delete) operations.
AbstractController is a class that accepts a generic parameter of type M, where M must be an instance of AbstractModel. This class serves as the intermediary between the GUI and the AbstractModel. It manages the communication, ensuring that user inputs from the GUI are properly handled and that the AbstractModel is updated accordingly. Additionally, it performs database queries and updates, facilitating seamless interaction between the user interface and the underlying data.
Windows Presentation Foundation (WPF) is a graphical subsystem, by Microsoft, for rendering user interfaces in Windows-based applications. It uses XAML for its design language and provides a unified model for building rich desktop applications. DesktopBusinessAppSharpBuilder further enriches WPF by adding a set of Custom controls such as Form, FormList, SubForm, and ReportViewer. They are designed to communicate with the AbstractController through their DataContext property. This design ensures that the controls can seamlessly interact with the controller, facilitating data binding and user interface updates.
You can download a Demo of this Framework in action here
You can download a executable of the Demo here
- Download the NuGet package DesktopBusinessAppSharpBuilder
- Open your App.xaml file
- Merge the ResourceDictionary as shown below:
 <Application.Resources>
        <ResourceDictionary>
            <ResourceDictionary.MergedDictionaries>
                <ResourceDictionary Source="pack://application:,,,/FrontEnd;component/Themes/FrontEndDictionary.xaml"/>
            </ResourceDictionary.MergedDictionaries>
        </ResourceDictionary>
</Application.Resources>- Structure your project as follow:
| Folders/Files | Description |
|---|---|
| View | Folder for UI's xaml files. |
| Controller | Folder for classes extending AbstractController |
| Model | Folder for classes extending AbstractModel |
| Themes | Folder for styling xaml files (optional) |
| Data | Folder for the database file (in this example a SQLite database) |
| Images | Folder for images to be used (optional) |
| App.xaml | The file which is the entry point of every WPF Application |
Assuming you have a database in the Data folder named "mydb.db", you have to create a Model class for each Table in your database.
Let's say your Database has a table called Employee structure as follow:
| Fields | Description |
|---|---|
| EmployeeID | PK NN AI |
| FirstName | Text |
| LastName | Text |
| DOB | Text |
| GenderID | FK INT |
| DepartmentID | FK INT |
| JobTitleID | FK INT |
| Text |
- Create a C# file in the Model folder.
- Extends AbstractModel.
- Each Model has to have a Parameterless constructors.
- Create a constructor that takes DbDataReader object as argument.
   using Backend.Model;
   using FrontEnd.Model;
   using System.Data.Common;

   namespace MyApplication.Model
   {
        public class Employee : AbstractModel
        {
           public Employee() { }
           public Employee(DbDataReader reader)
           {
               ....
           }

           public override ISQLModel Read(DbDataReader reader) => new Employee(reader);

        }
   }
An AbstractModel can represent the Table' structure through a set of attributes. Let's start by defining the backing fields:
NB: PrimaryKey fields in your Model Class must be of type long or Int64.
 long _employeeid;
 string _firstName=string.Empty;
 string _lastName = string.Empty;
 DateTime? _dob;
 string _email = string.Empty;
What about the Foreign Keys? Since Foreign Keys are fields representing a relationship between one Table and another, you have to represent this relationship between one Model and anoter. Therefore you will need to create Model classes for each:
  JobTitle? _jobTitle; //JobTitle is a class extending AbstractModel
  Gender? _gender; //Gender is a class extending AbstractModel
  Department? _department; //Department is a class extending AbstractModel
Update your constructor to fetch the data from the Database.
    public Employee(DbDataReader reader) //This constructor is called when data are fetched.
    {
        _employeeid = reader.GetInt64(0);
        _firstName = reader.GetString(1);
        _lastName = reader.GetString(2);
        _dob = reader.GetDateTime(3);
        _gender = new(reader.GetInt64(4)); //notice the Gender Model was defined with an additional constructor taking long as argument.
        _department = new(reader.GetInt64(5)); //notice the Department Model was defined with an additional constructor taking long as argument.
        _jobTitle = new(reader.GetInt64(6)); //notice the JobTitle Model was defined with an additional constructor taking long as argument.
        _email = reader.GetString(7);
    }
Define the properties for each backing field. These are the properties that will interact with the UI:
    [PK] //This attribute tells this property represents the Primary Key of the Employee Table.
    public long EmployeeID { get => _employeeid; set => UpdateProperty(ref value, ref _employeeid); }

    [Mandatory] //This attribute tells this property cannot be null or empty if it is a string.
    [Field] //This attribute tells this property represents a Field of the Employee Table.
    public string FirstName { get => _firstName; set => UpdateProperty(ref value, ref _firstName); }

    [Mandatory] //This attribute tells this property cannot be null or empty if it is a string.
    [Field] //This attribute tells this property represents a Field of the Employee Table.
    public string LastName { get => _lastName; set => UpdateProperty(ref value, ref _lastName); }

    [Mandatory] //This attribute tells this property cannot be null or empty if it is a string.
    [Field] //This attribute tells this property represents a Field of the Employee Table.
    public DateTime? DOB { get => _dob; set => UpdateProperty(ref value, ref _dob); }

    [Mandatory] //This attribute tells this property cannot be null or empty if it is a string.
    [FK] //This attribute tells this property represents a Foreign Key of the Employee Table.
    public Gender? Gender { get => _gender; set => UpdateProperty(ref value, ref _gender); }

    [Mandatory] //This attribute tells this property cannot be null or empty if it is a string.
    [FK] //This attribute tells this property represents a Foreign Key of the Employee Table.
    public Department? Department { get => _department; set => UpdateProperty(ref value, ref _department); }

    [Mandatory] //This attribute tells this property cannot be null or empty if it is a string.
    [FK] //This attribute tells this property represents a Foreign Key of the Employee Table.
    public JobTitle? JobTitle { get => _jobTitle; set => UpdateProperty(ref value, ref _jobTitle); }

    [Mandatory] //This attribute tells this property cannot be null or empty if it is a string.
    [Field] //This attribute tells this property represents a Field of the Employee Table.
    public string Email { get => _email; set => UpdateProperty(ref value, ref _email); }
The UpdateProperty(ref value, ref _var); method raises the INotifyPropertyChange event.
Also, remember to add the [Table] attribute at the beginning of your class. This attribute specify the name of the table.
     [Table(nameof(Employee))]
     public class Employee : AbstractModel
     {
        ...
     }
At this point, we are ready to tell the Application which Models it will have to manage. To do so, open your App.xaml.cs file and add the following constructor:
    public App()
    {
        Sys.LoadAllEmbeddedDll(); //load some custom assemblies that could be used later on.
        DatabaseManager.Add(new SQLiteDatabase(new Employee())); //Add the database object responsible for dealing with this table.
        DatabaseManager.Add(new SQLiteDatabase(new Gender())); //Add the database object responsible for dealing with this table.
        DatabaseManager.Add(new SQLiteDatabase(new Department())); //Add the database object responsible for dealing with this table.
        DatabaseManager.Add(new SQLiteDatabase(new JobTitle())); //Add the database object responsible for dealing with this table.
        DatabaseManager.Add(new SQLiteDatabase(new User())); //Add the database object responsible for dealing with this table.
    }
At this stage, the application knows where and how to get the data. Yet, before retrieving the data we have to degine a UI and a Controller.
At this point, the application interrogates the SQLite Database in the Data folder and retrieves the data. However, to display the data on a Form, we must first define a Controller object.
- Create a C# file in the Controller folder.
- Extends AbstractFormController.
namespace MyApplication.Controller
{
    public class EmployeeController : AbstractFormController<Employee>
    {
        public RecordSource Genders { get; private set; } = new(DatabaseManager.Find<Gender>()!); //Fetch the data to be displayed in a ComboBox control.
        public RecordSource Departments { get; private set; } = new(DatabaseManager.Find<Department>()!); //Fetch the data to be displayed in a ComboBox control.
        public RecordSource Titles { get; private set; } = new(DatabaseManager.Find<JobTitle>()!); //Fetch the data to be displayed in a ComboBox control.
        public override int DatabaseIndex => 0; // This tells the controller to use the first Database that was defined in the DatabaseManager class.
    }
}The fetching of the data is an Asyncronous Task managed by the LoadingForm control. To define a LoadingForm control:
- Create a Window.xaml file in your View folder.
- Ensure your import the following namespace: xmlns:fr="clr-namespace:FrontEnd.Forms;assembly=FrontEnd"
    <Window x:Class="MyApplication.View.LoadingForm"
            xmlns="http://schemas.microsoft.com/winfx/2006/xaml/presentation"
            xmlns:x="http://schemas.microsoft.com/winfx/2006/xaml"
            xmlns:d="http://schemas.microsoft.com/expression/blend/2008"
            xmlns:mc="http://schemas.openxmlformats.org/markup-compatibility/2006"
            xmlns:local="clr-namespace:MyApplication.View"
            xmlns:fr="clr-namespace:FrontEnd.Forms;assembly=FrontEnd"
            mc:Ignorable="d"
            ResizeMode="NoResize"
            WindowStartupLocation="CenterScreen"
            Title="Welcome" Height="450" Width="450">

        <fr:LoadingMask MainWindow="MainWindow">
            <Image Stretch="Fill" Source="your image path"/>
        </fr:LoadingMask>
    </Window>
The MainWindow property tells the Framework which Window must be open once the Task has completed.
In your App.xaml file, change the StartupUri property as follow:
StartupUri="View/LoadingForm.xaml"- Create a Window.xaml file in View. Name it MainWindow.
- Ensure your import the following namespace: xmlns:fr="clr-namespace:FrontEnd.Forms;assembly=FrontEnd"
- Open the MainWindow.xaml.cs and associate the Controller to your View File. Change the constructor as follow:
public MainWindow()
{
    InitializeComponent();
    DataContext = new EmployeeController(); //the Controller.
    ((EmployeeController)DataContext).Window = this; //tell the Controller which Window it is supposed to manage.
}
Now, we are ready to design our UI by adding and binding controls.
<Window x:Class="MyApplication.View.MainWindow"
        xmlns="http://schemas.microsoft.com/winfx/2006/xaml/presentation"
        xmlns:x="http://schemas.microsoft.com/winfx/2006/xaml"
        xmlns:d="http://schemas.microsoft.com/expression/blend/2008"
        xmlns:mc="http://schemas.openxmlformats.org/markup-compatibility/2006"
        xmlns:local="clr-namespace:MyApplication.View"
        mc:Ignorable="d"
        xmlns:fr="clr-namespace:FrontEnd.Forms;assembly=FrontEnd"
        xmlns:controller="clr-namespace:MyApplication.Controller"
        Title="Employee Form"
        WindowStartupLocation="CenterScreen"
        SizeToContent="WidthAndHeight"
        d:DataContext="{d:DesignInstance Type=controller:EmployeeControllerList, IsDesignTimeCreatable=False}" Height="490" Width="475"
        >
    <fr:Form> <!-- This is a Form Control -->
        <Grid Margin="10" fr:Definition.RowDefinitions="30,30,30,30,30,30,30,200" fr:Definition.ColumnDefinitions="80,150,30,150">
            <Label Content="First Name"/>
            <fr:Text Text="{Binding CurrentRecord.FirstName}" Grid.Row="0" Grid.Column="1"/>
            <Label Grid.Row="1" Content="Last Name"/>
            <fr:Text Text="{Binding CurrentRecord.LastName}" Grid.Row="1" Grid.Column="1"/>
            <Label Grid.Row="2" Content="DOB"/>
            <DatePicker SelectedDate="{Binding CurrentRecord.DOB}" Grid.Row="2" Grid.Column="1"/>
            <Label Content="Gender" Grid.Row="3"/>
            <fr:Combo ItemsSource="{Binding Genders}" SelectedItem="{Binding CurrentRecord.Gender}" Grid.Row="3" Grid.Column="1"/>
            <Label Content="Department" Grid.Row="4"/>
            <fr:Combo ItemsSource="{Binding Departments}" SelectedItem="{Binding CurrentRecord.Department, Mode=TwoWay}" Grid.Row="4" Grid.Column="1"/>
            <Label Content="Job Title" Grid.Row="5"/>
            <fr:Combo ItemsSource="{Binding Titles}" SelectedItem="{Binding CurrentRecord.JobTitle, Mode=TwoWay}" Grid.Row="5" Grid.Column="1"/>
            <Label Content="Email" Grid.Row="6"/>
            <fr:Text Text="{Binding CurrentRecord.Email}" Grid.Row="6" Grid.Column="1"/>
            <fr:CommandPanel Grid.Row="0" Grid.RowSpan="4" Grid.Column="3" CommandParameter="{Binding CurrentRecord}" UpdateCMD="{Binding UpdateCMD}" DeleteCMD="{Binding DeleteCMD}"/>
    </fr:Form>
</Window>
When you click on Run, a Loading Window will open fetching the data in the background. Once the Loading Taks is completed, the MainWindow will open.
Here you can:
- Navigate from one record to anoter.
- Add new records.
- Update a record.
- Delete a record.
All of this operations are handled by the Framework through the EmployeeController class. Each change to the records are reflected onto the Database. If you attempt to omit a mandatory field, a Alert Message will popup and any Update or Insert operation will not be performed until you fill all mandatory fields.
Explore the full code of a Demo Application here