I'm working as an Undergraduate Learning Assistant for CPSC 201 and wrote this guide to help out students who were in the same boat I was in when I first took Yale's Intro to Computer Science Course. It provides an overview of how to get started using Linux, guides you through setting up Windows Subsystem for Linux to run smoothly on Windows 10, and a very basic introduction to Linux.
- Introduction and motivation
- Setting up WSL
- Appendix A: brief intro to top-level UNIX directories
- Appendix B: random resources
- Additional contributors
So you're thinking of installing a Linux distribution, and are unsure where to start. Or you're an unfortunate soul using Windows 10 in CPSC 201. Either way, this guide is for you. In this section I'll give a very basic intro to some of options you've got at your disposal, and explain why I chose Windows Subsystem for Linux among them. All of these have plenty of documentation online so Google if in doubt. I've also included some additional links in Appendix B.
- Dual-booting with Windows and a Linux distro
- Will basically involve partitioning your drive and installing Linux from an external bootable USB through your computer's boot menu. You'll get the full Linux experience.
- Lots of Linux flavors to choose from. For beginners, Ubuntu and Linux Mint are generally recommended. I have Ubuntu 18.04 LTS, I'd recommend Ubuntu 20.04 LTS since it's newer, but it's all up to you.
- However, it can be a pain to constantly be switching between operating systems. Maybe you wanna make the full jump to Linux, maybe you don't.
- Life pro tip: if you go down this route, disable Window 10's Fast Startup feature as it will get very screwy with a dual-boot. I've also included a helpful guide in Appendix B.
- Using a virtual machine (VM) to run Linux
- Involves downloading a VM, downloading a .iso image file of whatever operating system you'd like, and running on your local machine.
- Devours RAM and is generally slower than other options presented here, would not recommend.
- Using terminal emulators
- These provide commands and functionality similar to a Linux terminal, but are still running on Windows architecture.
- These days, the most commonly-used Linux terminal is called bash. bash stands for Bourne Again Shell (no, Bourne is not a typo), and is likely what you'll be using as well.
- Terminal emulators generally don't include a package manager, i.e. you can't download new bash programs, so pretty limited for general usage. BUT you can install a package manager externally, kind of hacky but can work.
- Examples of terminal emulators include PuTTY, Git Bash, msys2 and mingw.
- Using Windows Subsystem for Linux (either WSL or WSL 2)
- WSL and WSL 2 provide a compatibility layer for running GNU/Linux programs natively on Windows 10. They have integration features with certain Windows 10 development apps (notably Visual Studio Code) as well.
- You've got two options, WSL and WSL 2. WSL 2 was recently released and features a real Linux kernel, as opposed to a simulated kernel in WSL. This means WSL 2 offers significant performance advantages, but still lacks some of WSL's features.
- WSL is what I currently use, and thus what I'll be talking about in this guide. I'm not necessarily recommending it, frankly I regret not doing a dual-boot sooner and ditching Windows, but a dual-boot isn't for everyone and takes a lot of time you might not have right now.
- Getting WSL initially setup is easy, but making it run smoothly requires some effort, and some features (like audio playback or displaying GUIs) require workarounds. I've provided some references in Appendix B. WSL will also not work properly with low-level system tools.
So if you've read this far I've convinced you to use WSL. Let's get started with setting it up. The very basics are outlined in Microsoft's guide here, I'll be covering what they talk about and diving into some other stuff.
Press the Windows key (henceforth Winkey) and type in PowerShell. Right-click the icon and select run as administrator. Next, paste in this command:
dism.exe /online /enable-feature /featurename:Microsoft-Windows-Subsystem-Linux /all /norestart
Now you'll want to perform a hard shutdown on your computer. This can become unecessarily complicated because of Window's fast startup feature, but here we go. First try pressing the Winkey, clicking on the power icon, and selecting Shut Down while holding down the shift key. Let go of the shift key and the mouse, and let it shutdown. Great! Now open up Command Prompt and type in
wsl --help
If you get a large text output, WSL has been successfully enabled on your machine. If nothing happens, your computer failed at performing a hard shutdown, in which case you can try the age-old technique of just holding down your computer's power button until the computer turns itself off. Make sure you don't have any unsaved documents open when you do this.
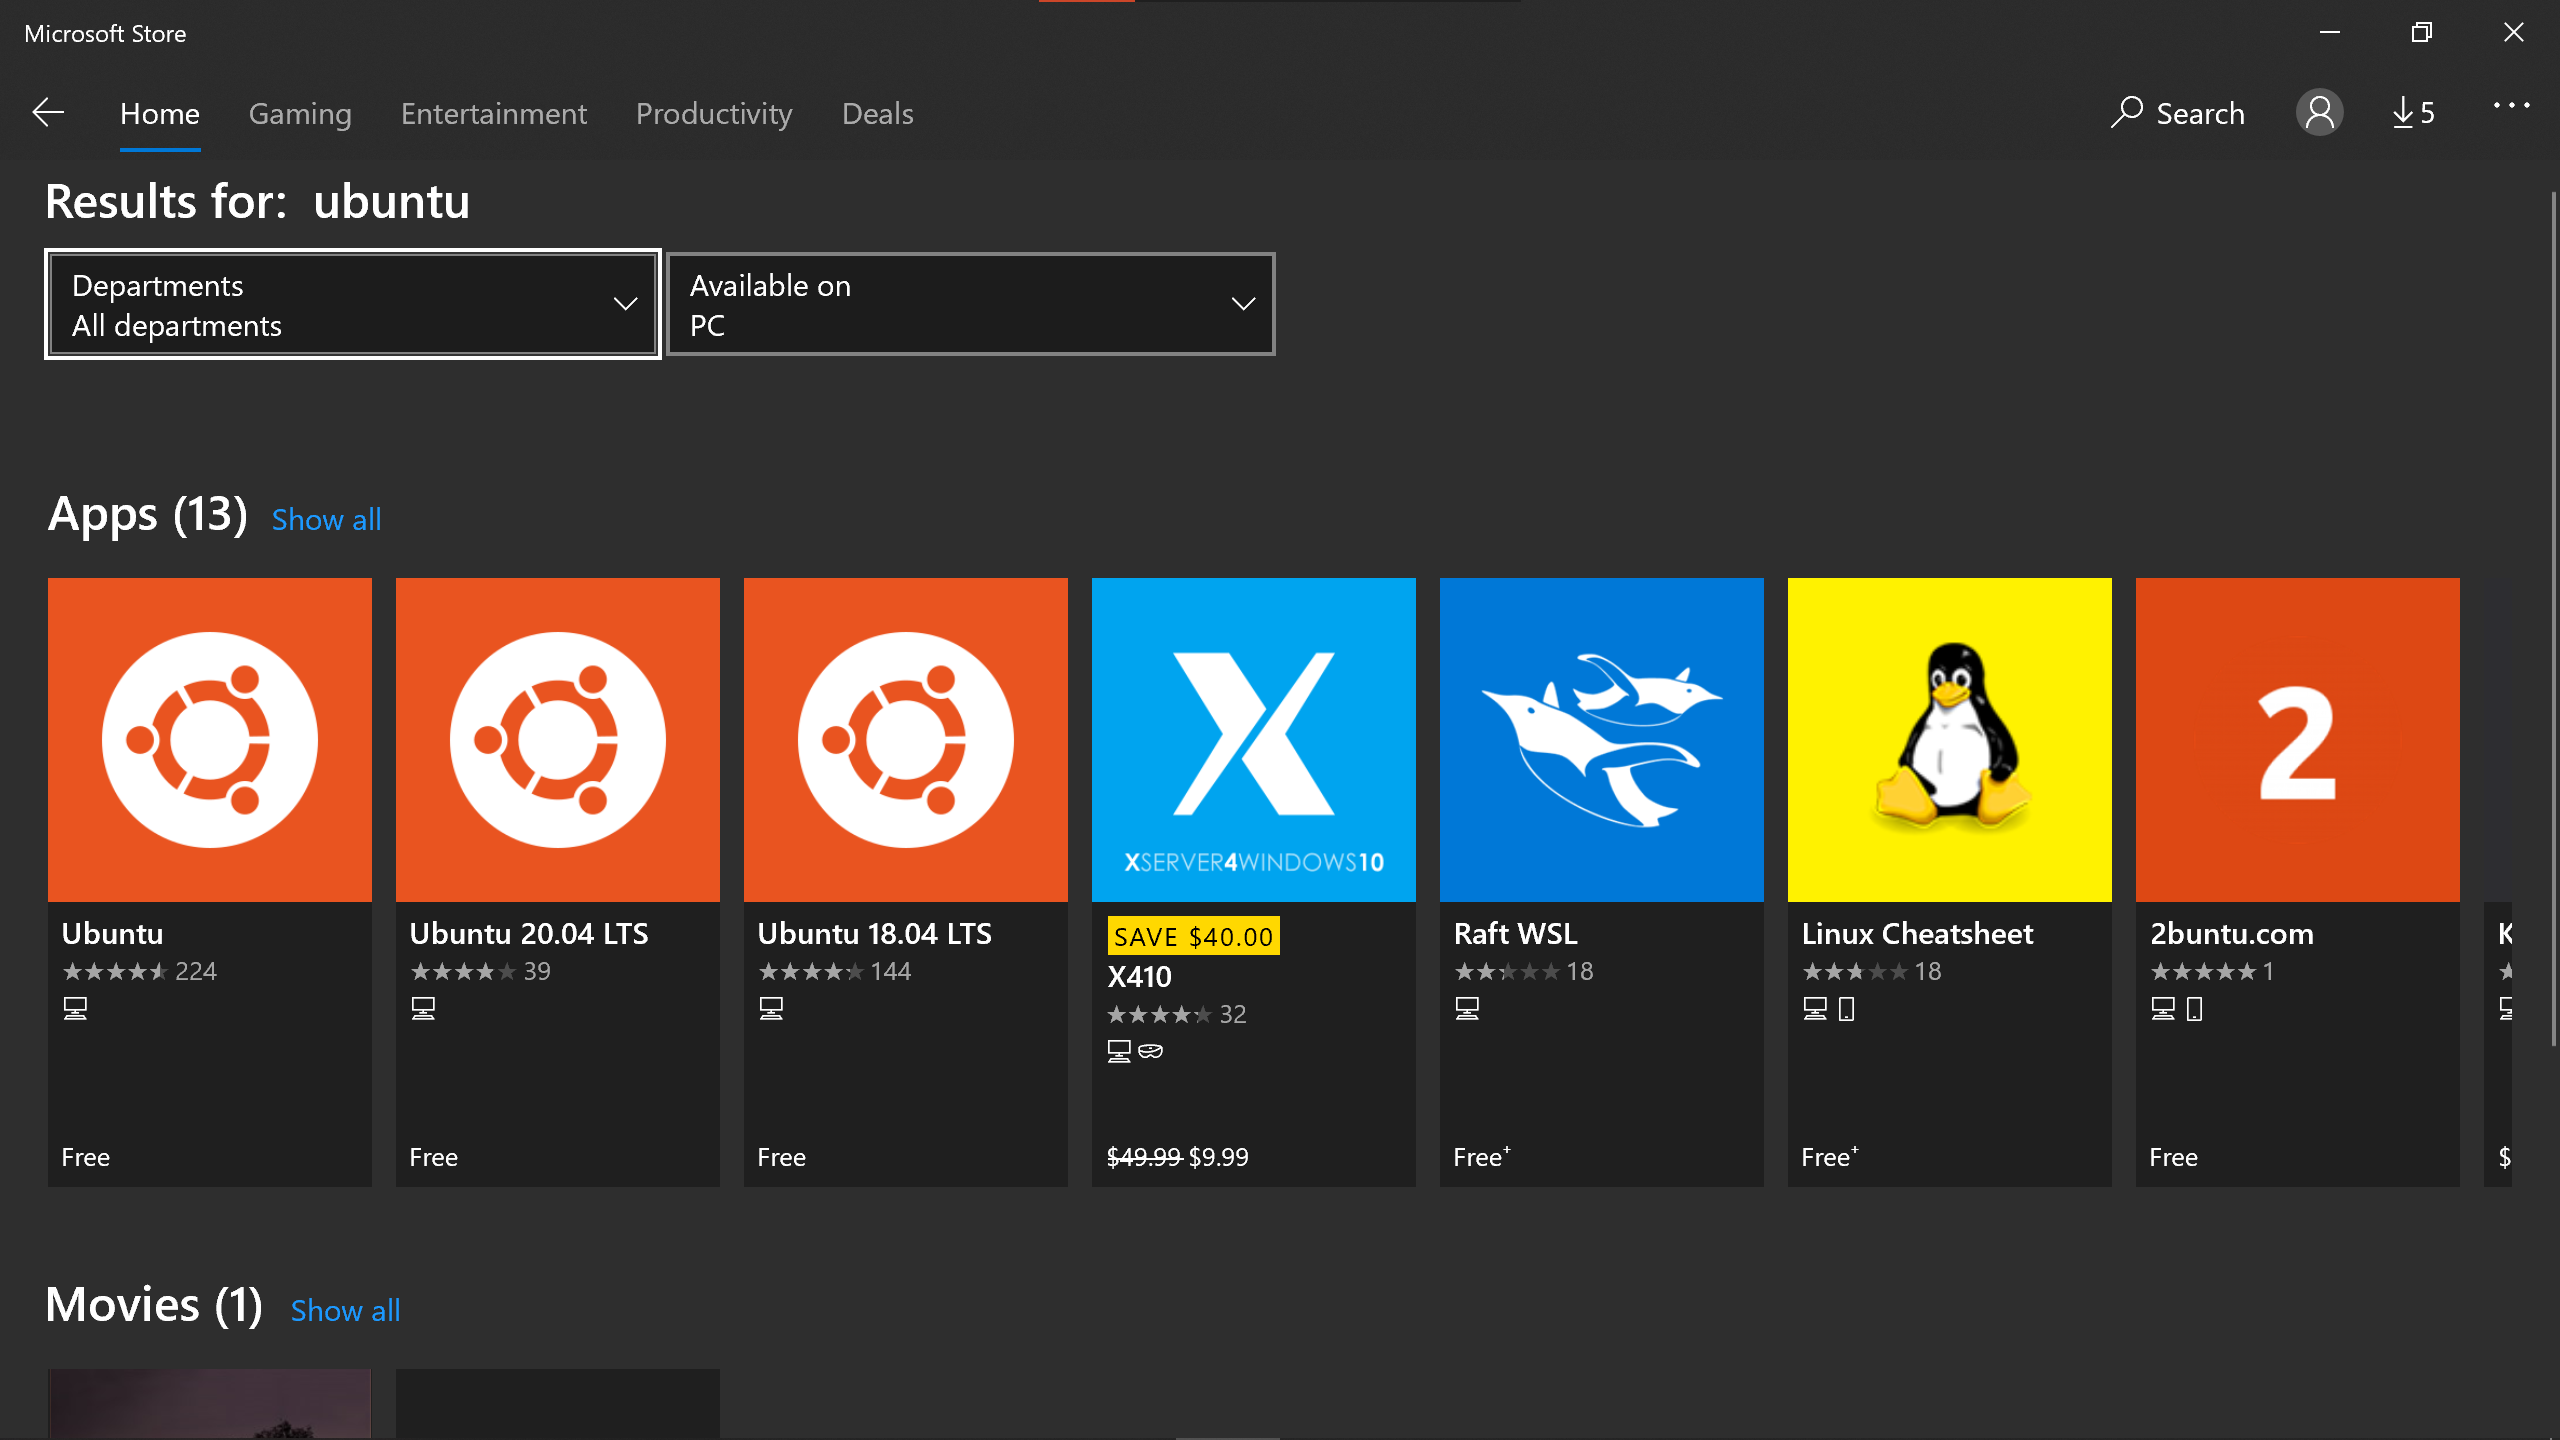
Great! Now that you've got WSL installed, let's download a Linux distro. Press the Winkey and type in Microsoft Store. Now use the store's search icon and type in Ubuntu. Ubuntu is a Debian-based Linux distribution, and seems to have the best integration with WSL, so that's what we'll be going for. If you want to be quirky, here are some other options. Once you type in Ubuntu three options should pop up: Ubuntu, Ubuntu 20.04 LTS, and Ubuntu 18.04 LTS.
Once that's done installing, again hit Winkey and open up Ubuntu. A console window should open up, asking you to wait a minute or two for files to de-compress and be stored on your PC. All future launches should take less than a second. It'll then prompt you to create a username and password. I'd recommend sticking to whatever your Windows username and password is so that you don't have to juggle around two different user/password combinations, but up to you.
Finally, to upgrade all your packages, type in
sudo apt-get update
And then
sudo apt-get upgrade
apt-get is the Ubuntu package manager, this is what you'll be using to install additional programs on WSL.
tl;dr skip to the next section
The two above steps are technically all you need for running WSL on your system. However, you may notice that whenever you open up the Ubuntu app your current folder seems to be completely random. If you type in pwd (for Print Working Directory, 'directory' is synonymous with 'folder') inside Ubuntu and hit enter, you'll likely get some output akin to /home/<your_username>. Where is this folder? Is it my home folder? Type in ls (for LiSt) to see what files are in this folder. Probably you won't get any output, because surprise surprise this folder is not your Windows home folder and is in fact empty (okay it's actually not empty, which we'll see in a bit. If you type in ls -a, a for All, you'll see other files but notice they have a period in front of them. This is a convention for specifying files that should be hidden by default, and ls, as well as most other commands, will honor this convention. Anyways).
So where is my Windows home folder? Is WSL completely separate from Windows? Nope! This is Windows Subsystem for Linux after all. Notice how, when you typed pwd earlier, the address you got was /home/<your_username>. Notice that forward-slash right before home. That forward-slash indicates the root directory (not to be confused with the /root directory), which is the directory at the top of the directory hierarchy and contains all other directories in your system. So if we type ls /, you'll see what are the top-most directories in your system. Okay, great. They have a bunch of seemingly random names. Except, shocker, they aren't random. I've provided a quick run-down in Appendix A.
For now, though, we'll focus on /mnt, which stands for mount. This is where your C drive, which contains all your Windows stuff, is mounted. So if you type ls /mnt/c, you'll begin to notice some familiar folders. Type in ls /mnt/c/Users, and voilà, there's your Windows home folder. Remember this filepath, /mnt/c/Users/<your_Windows_home_folder>. When we open up Ubuntu, we don't want it tossing us in this random /home/<your_username> directory, we want our Windows home folder. Let's change that!
Errata/Disclaimer: to be clear, this section and section 5 are completely optional. They provide a convenient way of accessing Windows files through WSL. However, as has been brought to my attention, these steps can break certain authentication features. I haven't personally experienced this, and find it very unlikely you would either, but it is something to be aware of.
Type in sudo vim /etc/passwd. You'll likely be prompted for your Ubuntu's password. sudo is a command that gives you root privileges in bash (akin to Windows's right-click then selecting 'Run as administrator'). vim is a command-line text-editing tool, which out-of-the-box functions kind of like a crummy Notepad (you can customize it infinitely though, and some people have insane vim setups. Appendix B has more info). /etc/passwd is a plaintext file that historically was used to store passwords back when encryption wasn't a big deal, but now instead stores essential user info used every time you open up WSL.
Anyway, once you've typed that in, your shell should look something like this:
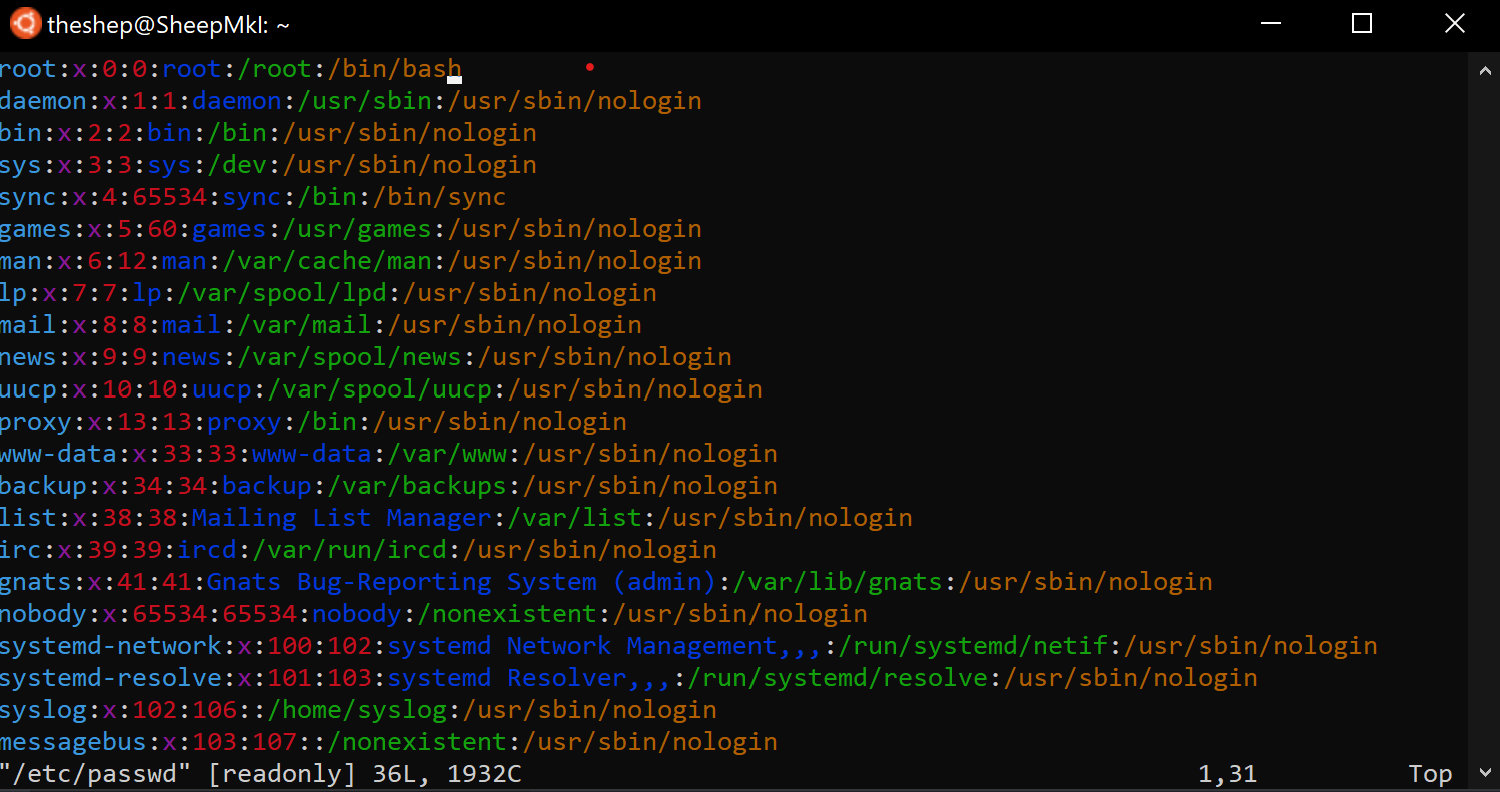
Using arrow-keys, find the entry that begins with your Ubuntu username. It should be towards the bottom of the file. In my case, the line looks like
theshep:x:1000:1000:,,,:/home/pizzatron3000:/bin/bash
See that cringy, crummy /home/pizzatron3000? Not only do I regret that username to this day, it's also not where we want our home directory. Let's change that! Press i to initiate vim's -- INSERT -- mode. Use arrow-keys to navigate to that section, and delete /home/<your_username> by holding down backspace. Remember that filepath I asked you to remember? /mnt/c/Users/<your_Windows_home_folder>. Type that in. For me, the line now looks like
theshep:x:1000:1000:,,,:/mnt/c/Users/lucas:/bin/bash
Next, press esc to exit insert mode, then type in the following:
:wq
The : tells vim you're inputting a command, w means write, and q means quit. If you've screwed up any of the above sections, you can also type in :q! to exit vim without saving the file. Just remember to exit insert mode by pressing esc before inputting commands, else you'll instead be writing to the file.
Great! If you now open up a new terminal and type in pwd, you should be in your Window's home folder! However, things seem to be lacking their usual color...
Your home folder contains all your Ubuntu and bash configuration files. However, since we just changed the home folder to your Window's home folder, we've lost these configuration files. Let's bring them back! These configuration files are hidden inside /home/<your_Ubuntu_username>, and they all start with a . in front of the filename. So let's copy them over into your new home directory! Type in the following:
cp -r /home/<your_Ubuntu_username>/. ~
cp stands for CoPy, -r stands for recursive (i.e. descend into directories), the . at the end is cp-specific syntax that lets it copy anything, including hidden files, and the ~ is a quick way of writing your home directory's filepath (which would be /mnt/c/Users/<your_Windows_username>) without having to type all that in again. Once you've run this, all your configuration files should now be present in your new home directory. Configuration files like .bashrc, .profile, and .bash_profile essentially provide commands that are run whenever you open a new shell. So now, if you open a new shell, everything should be working normally. Amazing. We're done!
Here are two handy commands you can add to your .profile file. Run vim ~/.profile, then, type these in at the top of the .profile file, one per line, using the commands we discussed previously (i to enter insert mode, esc to exit insert mode, :wq to save and quit).
alias rm='rm -i' makes it so that the rm command will always ask for confirmation when you're deleting a file. rm, for ReMove, is like a Windows delete except literally permanent and you will lose that data for good, so it's nice to have this extra safeguard. You can type rm -f to bypass. Linux can be super powerful, but with great power comes great responsibility. NEVER NEVER NEVER type in rm -rf /, this is saying 'delete literally everything and don't ask for confirmation', your computer will die. Newer versions of rm fail when you type this in, but don't push your luck. You've been warned. Be careful.
export DISPLAY=:0 if you install XLaunch VcXsrv, this line allows you to open graphical interfaces through Ubuntu. The export sets the environment variable DISPLAY, and the :0 tells Ubuntu that it should use the localhost display.
Additionally, as has been pointed out to me after writing this guide, you can actually access and navigate WSL directories inside File Explorer! To do this, open up File Explorer and click on the little icon in the address bar.
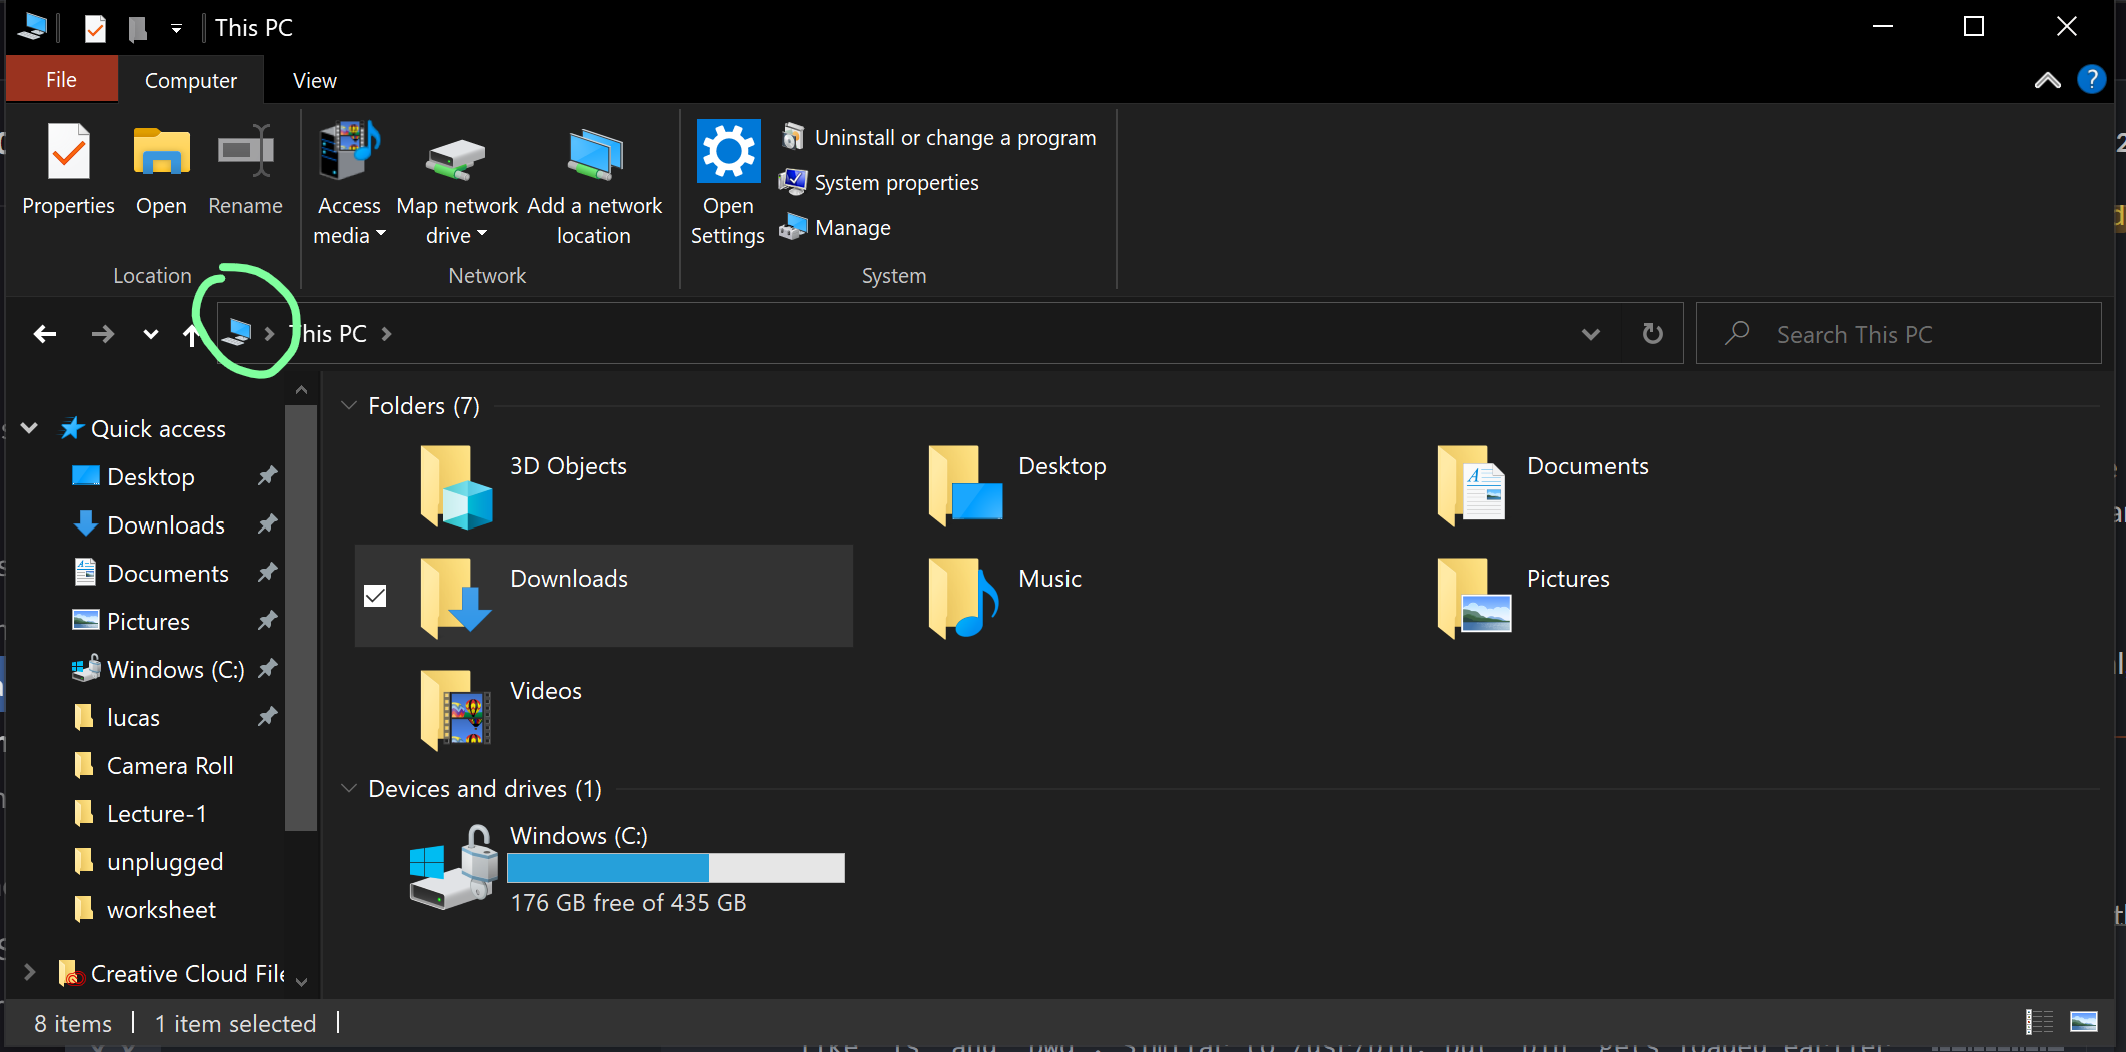
The path to your current folder should now be highlighted. Replace whatever's written with the following: \\wsl$\. Press enter, and you should see the Linux distribution you installed. In the case of this guide, it should be Ubuntu. Open up the folder, and voilà! You're looking at WSL inside File Explorer. You can also achieve the same result by opening up the Ubuntu terminal and typing in the command explorer.exe . to open up File Explorer in your present working directory.
tl;dr only mess with /mnt, /home, and maybe maybe /usr. Don't touch anything else.
bin: binaries, contains Ubuntu binary (aka executable) files that are used in bash. Here you'll find the binaries that execute commands likelsandpwd. Similar to /usr/bin, butbingets loaded earlier in the booting process so it contains the most important commands.boot: contains information for operating system booting. Empty in WSL, because WSL isn't an operating system.dev: devices, provides files that allow Ubuntu to communicate with I/O devices. One useful file here is/dev/null, which is basically an information black hole that automatically deletes any data you pass it.etc: no idea why it's called etc, but it contains system-wide configuration fileshome: equivalent to Window's C:/Users folder, contains home folders for the different users. In an Ubuntu system, under/home/<username>you'd find the Documents folder, Downloads folder, etc.lib: libraries used by the systemlib6464-bit libraries used by the systemmnt: mount, where your drives are locatedopt: third-party applications that (usually) don't have any dependencies outside the scope of their own packageproc: process information, contains runtime information about your system (e.g. memory, mounted devices, hardware configurations, etc)run: directory for programs to store runtime information.srv: server folder, holds data to be served in protocols like ftp, www, cvs, and otherssys: system, provides information about different I/O devices to the Linux Kernel. Ifdevfiles allows you to access I/O devices,sysfiles tells you information about these devices.tmp: temporary, these are system runtime files that are (in most Linux distros) cleared out after every reboot. It's also sort of deprecated for security reasons, and programs will generally prefer to userun.usr: contains additional UNIX commands, header files for compiling C programs, among other things. Kind of likebinbut for less important programs. Most of everything you install usingapt-getends up here.var: variable, contains variable data such as logs, databases, e-mail etc, but that persist across different boots.
Also keep in mind that all of this is just convention. No Linux distribution needs to follow this file structure, and in fact almost all will deviate from what I just described. Hell, you could make your own Linux fork where /mnt/c information is stored in tmp.
- Ubuntu basics
- Using WSL in VSCode
- Intro to regex for Linux
- Installing Docker on WSL
- Setting up audio on WSL
- Installing WSL 2
- Windows 10 / Ubuntu Dual-boot
- Spicing up vim
- 09/02 Wendy, pointed out error with paragraph 5 code
- 09/02 /u/gordonmessmer, various corrections and suggestions
- 09/02 /u/pobrn, various corrections and suggestions
- 09/03 Tim, explained usage of
\\wsl$\andexplorer.exe .