Calibration of Slic3r
Prusa has some neat Calculators for setting up a printer.
Make sure that the following steps are fulfilled before trying to tweak Slic3r settings
- everything is properly aligned.
- everything is wired up correctly
- steps/mm are set up correctly (a good source: Triffid hunters calibration guide)
- If possible get an Infrared thermometer and measure how accurately your hotend will heat up. It should not have much difference
- Same counts for the Heated Bed (if available)
- Make sure the bed is properly leveled and the nozzle height set up correctly (very important!) a good tutorial can be found here
- You have installed a Host Software and successfully connected your printer
- You have the appropriate tools
- Caliper (good manual Calipers are to be preferred over digital ones)
- Sensor gauge (or credit/business card)
- If possible, get an Infrared thermometer and measure the temperature of your hotend after it heats up. There should not be much difference between the thermocouple temperature and Infrared thermometer reading.
At first start up, a Setup Wizard will occur and guide you through the basic settings. The most steps will be self explanatory but we will include them for completeness.
- Choose your G-code flavour. This should match your firmware. If you have a Smoothieboard for example, choose "Smoothieware"
- Set up your bed size (in mm)
- Choose your nozzle diameter - Do not measure around. Just put in the value you bought it with
- Type in your filament diameter (1.75 or 3mm) again - do not measure around. We will tweak this value later (Finetuning)
- Choose the temperature for the filament you are using: 190°(PLA) or 220°(ABS) - If provided, use the middle of the suppliers range
- If you have a bed, set the bed temperature to 60°(PLA) or 110(ABS)
Your Printer is now very roughly set up and you should be able to print
-
You are able to print with your rough setup
-
Switch to expert mode
-
Download the calibration files:
Heattower.stl
20-mm box.stl -
Do this fine tuning for every manufacturer/material you want to use for best results. You will see why on the "temperature" part below.
- Get your calipers and measure the thickness of your filament
- Move roughly ~20 centimeters further and measure again
- Repeat this step 4 times so you have 5 values and 1m of measured filament. The values could for example be: (1.72mm; 1.74mm; 1.73mm; 1.71mm; 1.77mm)
- Take the average by adding the values together and dividing them by 5:
1.72
1.74
1.73
1.71
1.77 +
=========
8.67/5 = 1.734 -> 1.73 (2 decimal places)
- Take the result with 2 decimal places (in this Example 1.73) and put it into your filament settings.
A good tutorial for the first layer height can be found in the Slic3r manual here
For temperature settings you should first get the recommended temperature range from your supplier.
- Get the stl File
- Put it in Slic3r
- Go to Print Settings. Choose the following Settings:
General:
- Layer height: 0.2 mm
- Perimeters: 1
- Solid Layers Top: 0, Bottom: 3

Infill:
- Fill density: 0%

Speed:
- Perimeters: 40 mm/s
Start printing the object with the maximum temperature the suppler lists. Whenever you see a indentation (every 5 mm), lower your temperature by 5°C.
Stop the print when your nozzle can't print out enough Filament (as shown in the Example below) or the print quality decreases again
Here are two examples:


The area with the best layer adhesion AND best visuals is your perfect temperature for this particular speed and material. Usually the higher the temperature the better the adhesion so you can take the highest, good looking temperature.
If you don't reach your perfect temperature with one heatcube you can print another one starting with the last temperature.
You may also print another heattower, start by 5 degrees over your "perfect" temperature and decrease it by 1° steps. then choose a temperature 2-3 degrees under the "too hot" temperature
In the examples you can also see why its important to do this with every material/Manufacturer: The filaments tend to have different ideal temperatures which may even vary by colors from the same manufacturer.
Print out the general purpose 20mm Cube with the following Settings:
- vase mode (single outline, no infill, no top or bottom layers)
- extrusion multiplier: 1
- extrusion width = nozzle width- Measure the thickness of all 4 walls with a caliper and get an average of the 3 smallest values.
- Change your extrusion multiplier: new multiplier = old multiplier x (extrusion width / average measurement)
- Repeat until you are happy
Tips:
- Make sure you measure from the top as the bottom might be flattend out from the Bed.
- if you have big variations it is a good idea to measure the side that is extruded last as the extrusion will have mostly stabilised by then
- Try to measure the smallest number of layers possible from top as the slightest vertical misalignment of your layers will increase the measured value. Ideally a single layer would be best but very difficult with regular calipers.
- Make sure you don't apply to much pressure with your calipers (Make sure the measuring device is not biting into the filament during measurement.)
Do not forget to save Your calibration settings.
- You are able to print in reasonable quality after your "Basic Tuning"
- Switch to expert mode
- Download the calibration files:
Speedpillar.stl
Retraction_Twins.stl overhang.stl
Once the printer is reliably producing good quality prints it may be desirable to increase the speed. Doing this provides several benefits, the most obvious of which is that the results are produced quicker, but also faster print times can be utilised in producing more layers, i.e. lower layer height, thus improving perceived print quality. An additional benefit is that faster travel movement between extrusions can reduce the effects of oozing.
- For speed it is recommended to first adjust the travel speed. Increment it slowly up until you can see errors and/or are not comfortable with the results anymore. Then take a value that is 10-20% lower.
- Always choose a reasonable low homing speed as the print head will bash into the end stops just slightly and might damage them over time!
- It is also important to know that speed is limited by hardware setup, temperature and Data transfer. If the Hardware is capable enough you might switch to printing from a good and fast high class rating SD card as you might print up to 60% faster ;) ( video here )
- start printing the speedpillar.stl with the following settings
Layers and Perimeters:
Perimeters: 2
Solid Layers Bottom: 2
Solid Layers top: 0
Infill: 0%

Speed:
Perimeters: 30mm/s
External Perimeters: 100%
- Every few layers increase the printing speed a bit until you see a visible decrease in print quality
- Choose the speed with the best visuals
- Do the Temperature test from the part "Basic tuning"
- Repeat the speedtest until you no longer get a better result.
Tips:
- if you increase print speed, your layer adhesion might suffer. Check that out! A higher temperature could compensate for that.
- To get even more speed, you can try to install a high rated class 10+ SD-card video comparison here
- After that set your outer perimeters to a lower value. Personally I use 30mm/s for them no matter what (check if your temperature is not to high for that.) Same counts for first layer speed.
- You might set your infill speed slightly faster but when tuning speed to maximum I would set them to 90-110% of perimeter speed to ensure maximal stability and layer bond.
Typical Retraction issue:
Retraction does not (only to a very minimal value) suck the melted filament out of the nozzle. Instead, it relieves pressure which forces the filament out.
There is a lot of misunderstanding out there on to which retraction values to choose. I've seen values out there between 0.1 and 20mm. The best value is the minimum amount required to stop oozing/leaking/stringing
- in general a value between 1 and 5mm* is good. If you still have issues with 5mm, turn down the temperature. Also increasing travel speed (Advanced tuning) might help.
- Set up your travel speed before tweaking retraction settings! (Part advanced tuning)
- Print the retraction twins with the following Settings:
- Layer Height: 0.3mm
- Infill: 25%
- Perimeters: 2
- Solid Top Layers: 2
- Solid Bottom Layers: 2

- Retraction: 0.5mm
- Retraction speed: 40-80mm/s based on what your hardware is capable of
- Print the retraction twins with 0.5mm increased retraction until you almost cannot see any "blobs" any more.
- If 5mm are not enough try lowering your print temperature.
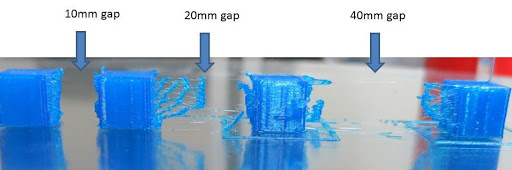
*Bowden setups might need a little more retraction as the filament will act like a spring in the Bowden tube.
It is in general good to know how much overhang you can print with and what the support threshold should be. This varies from material to material and also with layer heights
- Print Overhang.stl with the following Settings:
Infill: 20%
Perimeters: 3
Top layers: 3
Bottom Layers: 3
- Afterwards you can look at which overhang your printer starts to fail. Set the support threshold in slicer below that threshold.
- It is recommended to have cooling enabled!
A common test for the own Printer is the "Benchy" - print it without support!