An end to end object detection tool. All the way from capturing and labeling a dataset of images, to training and deploying an object detection neural network.
This package makes use of the Harvesters machine vision image acquisition library for capturing images so a GenICam compliant machine vision camera is required.
Boja translates to "let's see" in Korean.
Here is an overview of the boja pipeline:

The following will not work for arm64/aarch64 (Jetson Tx2 etc). For arm64 specific instructions, see ARM64 section.
Boja uses the GenICam Harvesters library for image acquisition.
Harvesters Repository: https://github.com/genicam/harvesters
Harvesters is a consumer that requires a genTL (GenICam Transport Layer) producer to produce images for it to consume.
A good option for a GenTL producer is one supplied by Matrix Vision. To install it, visit:
http://static.matrix-vision.com/mvIMPACT_Acquire/2.29.0/
And download the following two packages:
install_mvGenTL_Acquire.sh
mvGenTL_Acquire-x86_64_ABI2-2.29.0.tgz
Then run the following with your user (not sudo):
$ ./install_mvGenTL_Acquire.sh
This will install mvIMPACT_Acquire at the location /opt/mvIMPACT_Acquire
The file that we are concerned about is the genTL producer which by default will be
located at:
/opt/mvIMPACT_Acquire/lib/x86_64/mvGenTLProducer.cti
Recommended: Install dependencies inside a virtual env
Install numpy and Cython first or else some of the package installation will fail
$ pip install numpy Cython
Now install the rest of the dependencies:
$ pip install -r requirements.txt
The installation process will be different for arm64. Recommended: Install dependencies inside a virtual env
Install numpy and Cython first or else some of the package installation will fail
$ pip install numpy Cython
Install some dependencies:
$ pip install -r requirements-arm.txt
Install build and install opencv using the instructions from the following page:
https://pythops.com/post/compile-deeplearning-libraries-for-jetson-nano
You will have to manually copy the resulting cv2 site package into your virtual env site packages if you are using a virtual env.
Install pyTorch v1.4 and torchvision v0.5.0 according to the instructions on the
following page:
https://devtalk.nvidia.com/default/topic/1049071/jetson-nano/pytorch-for-jetson-nano/
Since the Harvesters library's GenICam dependency is not available for arm yet,
we will have to use a vendor specific image acquisition library in order to use the
capture and predict functionality of boja. For FLIR machine vision cameras, we can use
Spinnaker and PySpin. Included with the boja package, there are PySpin variants of the
capture and predict modules.
Install the latest Spinnaker and PySpin from:
https://www.flir.ca/products/spinnaker-sdk/
Boja expects a certain data file structure for file input and output.
Data file structure:
├── <local_data_dir>
│   ├── labels.txt
│   ├── annotations
│   ├── images
│   ├── logs
│   ├── images
│   ├── manifests
│   └── modelstates
This structure will be created by running the configure module with:
$ python -m vision.configure
Optional flags include --local_data_dir where you can specify where the data files will be kept locally. By default, this value is:
~/boja/data
This project is BYOB (bring your own bucket).
The configure module, like most other modules in the boja package, has the optional
flag --s3_bucket_name. You can use any s3 bucket that you have access to. This will
allow boja to download preexisting data from the s3 bucket and to also upload generated
data. You can specify the base directory of your data within the s3 bucket with the
flag --s3_data_dir, which by default will be:
data
The s3 data subdirectory structure is a mirror of the local data subdirectory structure.
If this module is run with a valid s3 bucket name argument, then the local data and s3 data will be synced. All local data missing from s3 will be uploaded and all s3 data missing locally will be downloaded.
To view the details of the optional parameters, run:
python -m vision.configure --help
 This module is used to capture, display, and save images to add to the training dataset.
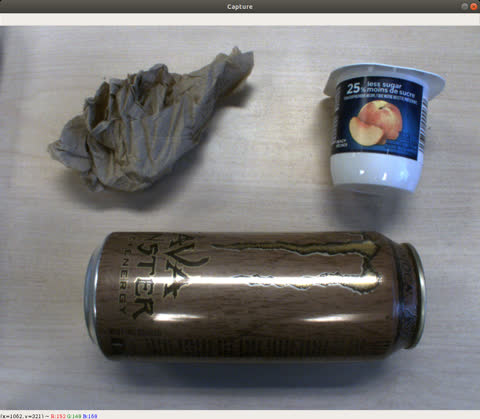
There are two versions of the capture module. One uses Harvesters and is for general use with all GenICam compliant machine vision cameras. The other uses PySpin and is for use specifically with FLIR machine vision cameras. The Harvesters version is not compatible with Arm64 based devices, while the PySpin version is.
To use the Harvesters version:
$ python -m vision.capture.capture_harv
To use the PySpin version:
$ python -m vision.capture.capture_spin
Then press 'enter' to save images. Press 'escape' to exit.
If the flag --s3_bucket_name is used, then all captured images will be both saved locally and uploaded to s3.
The flag --help can be used to display all optional flags.
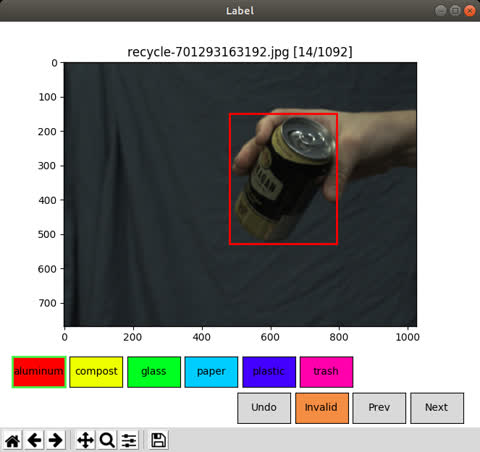
 A matplotlib based GUI utility for annotating images with labels and bounding boxes.
For this module, a labels.txt file required. This file has to be placed in the local data directory:
├── <local_data_dir>
│   ├── labels.txt
│   ├── ...
The labels.txt file should contain the labels you wish to apply to the bounding boxes of your image. Each label should be on its own line. For example, contents of a labels.txt file would be as follows:
aluminum
compost
glass
paper
plastic
trash
To label images:
$ python -m vision.label.label
The output annotation files will be saved in <local_data_dir>/annotations/ by default.
The output manifest files generated will have a filename [UNIX_TIMESTAMP]-manifest.txt
and be saved in <local_data_dir>/manifests/.
Each line in the manifest contains a comma-separated list of the image filename and
annotation file name. For example:
...
image-123.jpg,annotation-abc.xml
image-456.jpg,annotation-def.xml
...
If the image is labeled as "Invalid", the string Invalid will show beside the image file in place of an annotation file. This image will be excluded from the training dataset.
When a new manifest file is generated, the contents for the previous manifest file are copied into the new file. The new 'image file, annotation file' pair lines are appended to the end of the new file.
When an s3 bucket is specified with the --s3_bucket_name flag, then any images and manifests from the dataset not present locally will be downloaded. Any annotation and manifest files generated by the label module will be uploaded to s3.
 Training is done using pyTorch with torchvision. It is based off of the torchvision
detection reference: https://github.com/pytorch/vision/tree/master/references/detection
Training is done using pyTorch with torchvision. It is based off of the torchvision
detection reference: https://github.com/pytorch/vision/tree/master/references/detection
The neural network architecture used is Faster R-CNN. As of yet, the best option for the network backbone has been found to be resnet50, with the full network pretrained on the popular coco dataset. Other options for the network backbone can be selected with the --network flag.
By default the program will load the latest manifest from the previous labeling step and use the images and annotations it references for training and evaluation.
To begin training:
$ python -m vision.train.train
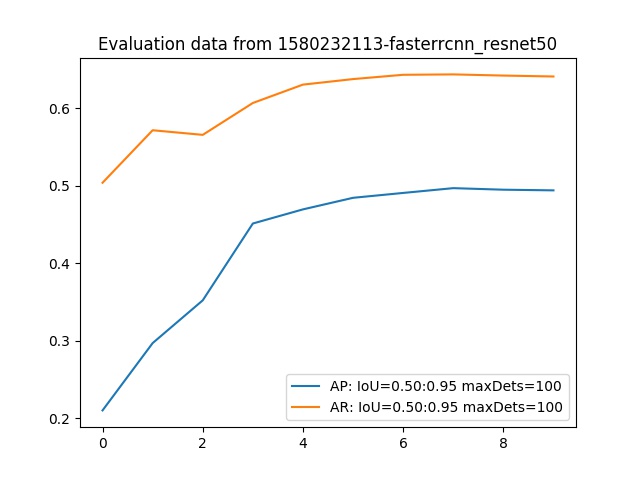
At the end of training and evaluation, the model state will be saved so that we can
load it later for deployment. A plot of the Average Precision and Recall over the
training/evaluation epochs will be generated and saved as well for comparison against
previously trained models. Here is an example log chart:
If there is a cuda enabled GPU on the system that is visible to pyTorch, then it will be utilized to accelerate the training and evaluation process.
If the -s3_bucket_name flag is used, then the latest images, annotations, and manifests will be loaded from s3 prior to training. Then at the end of training, the trained model's state and the training evaluation plot will be uploaded to S3.
To get an idea of how our model is performing, it may help to see it in action.
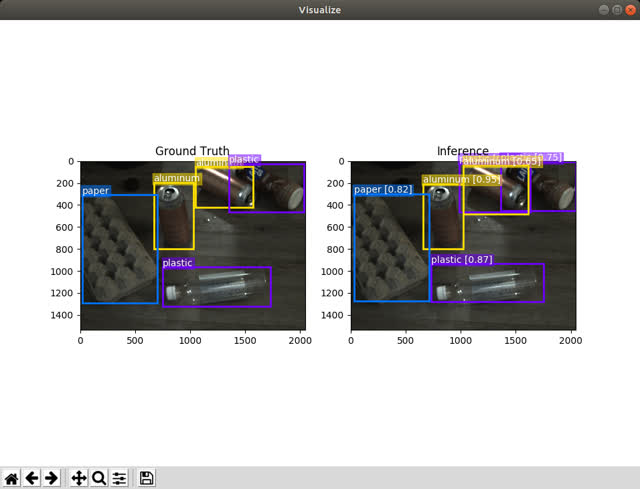
To run the trained model on the training/evaluation data set:
$ python -m vision.train.visualize
This will display the trained model's predictions alongside the ground truth labeled bounding boxes. Though this isn't really a representation of how the model will behave in the wild as some of the input has been used in training, it is still satisfying and helpful to visualize the model outputs side by side with the ground truth.
If a GPU is available on the system, then it will be used to accelerate the model.
 The end goal of this process is to deploy our trained object detection network on a
live image feed.
The end goal of this process is to deploy our trained object detection network on a
live image feed.
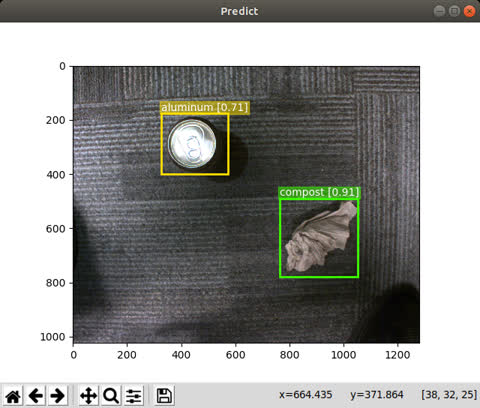
To run the Harvesters version:
$ python -m vision.predict.predict_harv
To run the PySpin version:
$ python -m vision.predict.predict_spin
The backbone network to be used with Faster RCNN can be specified with the --network flag. The user can choose to supply a model state path with the flag --model_path. If not, then the newest saved model that matches the network type will be loaded. If an s3 bucket is supplied with --s3_bucket_name, then the newest model state that matches the network type will be downloaded from s3 if it is not already present locally.